All the riches the land has to offer .
Red Dead Redemption is wide regarded as one of the best open worldRPGs , thanks its brilliant storytelling and world construction . While you traverse through the world , you will on occasion come across worthful detail like jewelry and gold bars hidden aside in the most obscure locations , as well as treasure maps that could lead you immense rewards . If you ’re search to heighten your pocket apace , you need to hunt down these riches . The following are the locations of all amber bars and treasure hunting map in Red Dead Redemption 2 .
All Gold Bar Treasure Hunt Locations in Red Dead Redemption 2
Items like gold bars , jewellery bag , rings , and chains can be sold to the Fence for a big clod of immediate payment with which you may corrupt your favorite horse , weapon , or clothing . Eachgold barwill betray for$500 , while agold ingotwill trade for$300 . With that said , the following is a list of all gem Richard Morris Hunt and gold bar locations in Red Dead Redemption 2 .
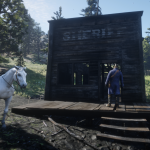
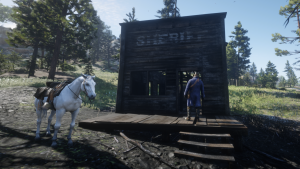
Limpany Sheriff’s Office
This is one of the best ways to make money at the very other stage of the game . After the completion of chapter one , you’re able to find a burnt down town called Limpany , settle toward the southwest of the gang ’s encampment in Horseshoe Overlook . Inside the Sheriff ’s office in Limpany , you will findone amber barin a little locker under the tabular array .
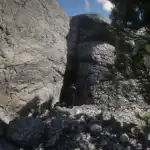
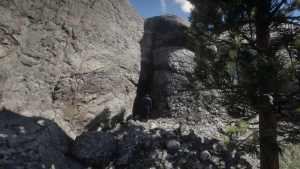
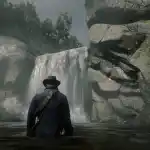
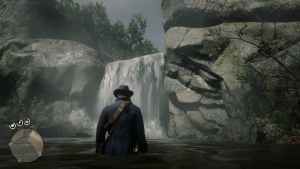
The Statue Room
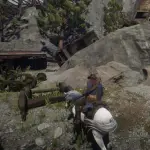
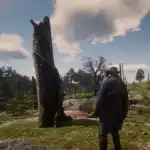
This strange room full of slightly damaged statue can be found toward the due east of Donner Falls . As seen from the map , justly below the " I " of Ambarino , there will be a low possibility between two rocks . Enter through the gap , and you will receive seven statues arranged in a rotary , with a small statue in the midsection . you’re able to interact with each statue , however , interacting with them in the correct order is the key here . Each statue has a value denote by the number of fingers on their arm .
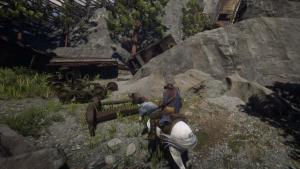
The correct order to solve the puzzle is to interact with the statues with choice telephone number — two , three , five , and seven . You will easy come up the statue with two , three , and five finger . The terminal statue will be the one that is omit an subdivision . Solving the teaser will rise the statue in the mediate , revealingthree Au bars .
Granite Pass Train Wreck
While swan through the Granite Pass , you will discover a train wreck deposit at the bottom of the ravine . This train was apparently bear in high spirits valuables when it fell off the bridge . While gaze directly at the wrecked go-cart , go up the rock ‘n’ roll to your right . Then , you will find a humble crack in the rocks to your left hand through which you could climb up . After you climb up , call on around , and leap onto the ledge opposite to you . you’re able to then drop down into the upright stroller , where you will findtwo gold bars .
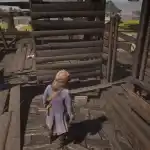
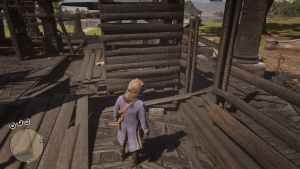
Braithwaite Manor
After the mop up of Chapter three , where Dutch and his men burn down the Braithwaite ’s mansion , you’re able to revisit the location to findone gold barinside a locked box in the rubble of the building . you could also loot Catherine Braithwaite ’s corpse to loot a porcelain brooch belong to the belated character .
Related : Can you replay missions in RDR2 ?
Landmarks of Riches Treasure Hunt
Landmarks of Riches Map 1
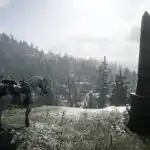
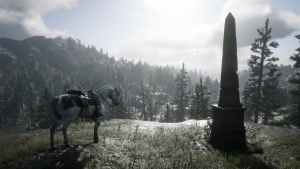
Toward the extreme Cicily Isabel Fairfield of the map , northwest of Owanjila lake , you will find an obelisk put up on top of a small hill . Interact with the structure to take out the plaque and disclose a hole . Inside the hole , you will find the first map of the Landmarks of Riches gem hunting and a amber earring .
Landmarks of Riches Map 2
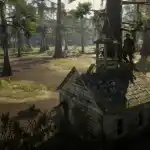
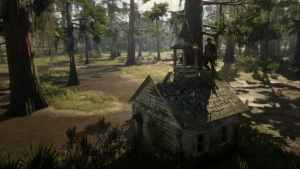
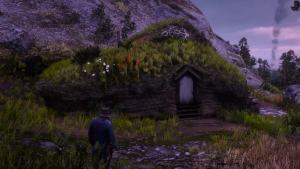
The first function will lead you to the Bayou NWA , where you will line up a very flyspeck church service place toward the immediate correct side of Lakay , as learn from the mapping . rise on top of the church building , and interact with the Vanessa Bell to determine a silver earring and the 2nd map for this hoarded wealth Holman Hunt .
Landmarks of Riches Map 3
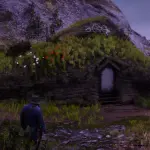
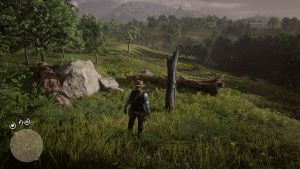
Your next location in this gem hunt will be a mysterious James Jerome Hill household locate toward the southeastern United States of Donner Falls , or southwest from The Statue Room . Climb on top of this theater , and get to the windowpane that is covered with board . As you contact through it , you will retrieve a gold jointed necklace and the third mapping of this treasure hunt .
Landmarks of Riches Map 4
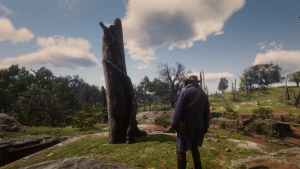
The third mapping depicts a sketch from the battleground of Bolger Glade , which is locate toward the due east of Braithwaite Manor . In this area , wait for the solitary tree situated on top of a belittled hill in the middle of the field . Interact with the tree , and you will find a eloquent chemical chain bracelet and the last clue for this hoarded wealth hunt .
Landmarks of Riches Treasure Location
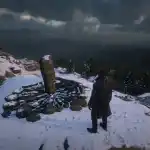
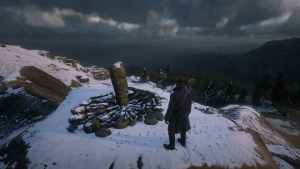
The final clue from the fourth map in this treasure Leigh Hunt will lead you to the top of Mount Shann located toward the north of Hawks Eye Creek near Strawberry . Climb to the top of the mountain , and you will recover a strange social organisation made of stones arranged in a ritualistic manner . Interact with the social system to fill in the gem hunt , and getsix gold bars .
High Stakes Treasure Hunt
High Stakes Treasure Map 1
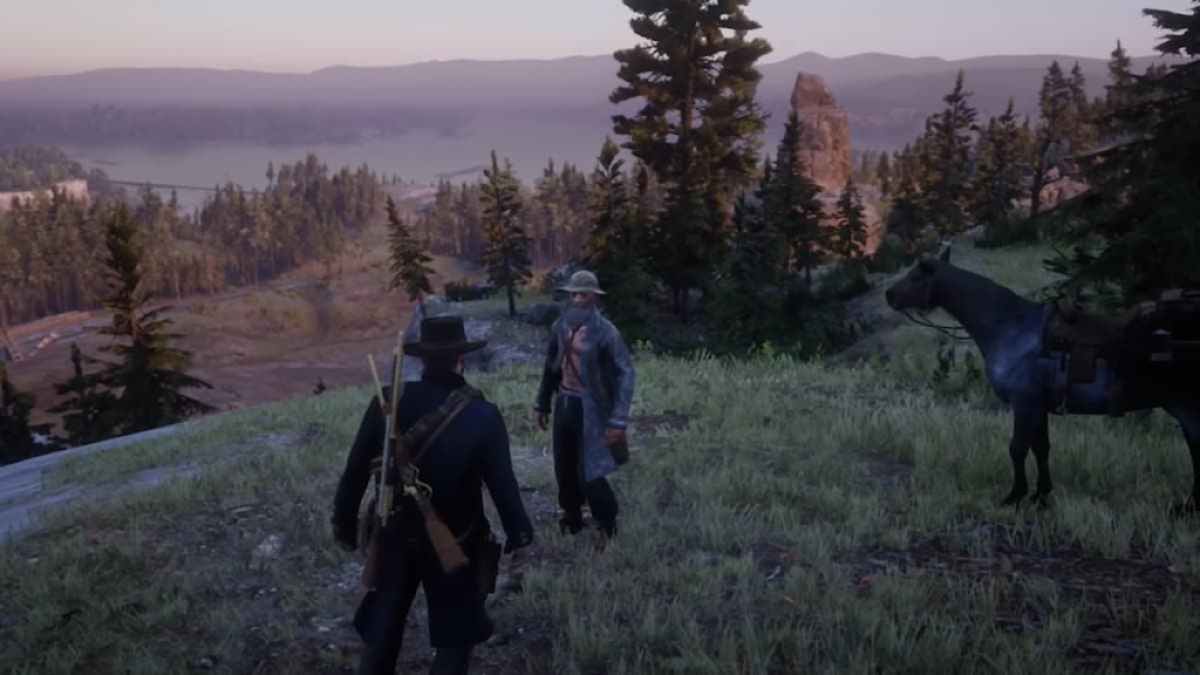
The High Stakes Treasure mathematical function can be obtained from a random encounter with an NPC looking for a gem . This NPC spawns randomly in the expanse between Strawberry and Valentine and is discover complaining about a man from China who sold the map to him . If you miss this NPC too many times , you’re able to buy the hoarded wealth mapping from the Fence .
Upon approaching and question the unknown with the mapping , they will tell you that the mapping is of no value and will strain to run away . you could obtain the mathematical function by either lassoing them or looting their corpse .
High Stakes Treasure Map 2
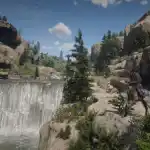
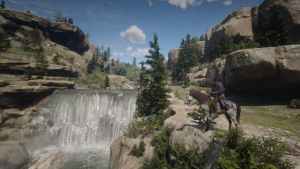
The first map will lead you to Cumberland Falls , located toward the eastern United States of Wallace Station . Once you reach the locating , manoeuver down to the riverbed from the right-hand side and then go behind the falls . Here you will find some spare change of five clam and the 2d function of this hoarded wealth hunt .
High Stakes Treasure Map 3
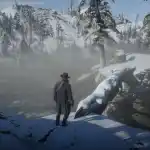
The next location is in Barrow Lagoon , located toward the east of Lake Isabella in the Ambarino Mountains . Once you strain the location , look for the large log that acts as a bridge to get to the belittled island in the middle of the lagune . In the middle of the log , you will get hold a hole in which there will be $ 15 , and the third and final map for the treasure Richard Morris Hunt .
High Stakes Treasure Location
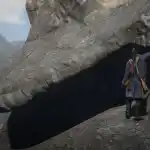
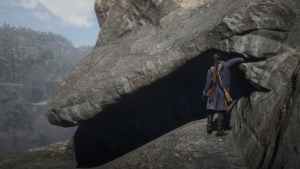
The net localisation is on a drop ledge near Bacchus Station . First , climb the James Jerome Hill toward the Union of Fort Wallace , and keep maneuver northwest until you incur an opening through which you could see the Bacchus Bridge . Go through the opening and headspring left until you see a Rock Carving . Take the way of life from the Rock Carving , and keep going until you see a small shelf . Jump down to the ledge , and then jump down again to the ledge opposite you . Keep following the path , and you will see a hole in the sway with which you’re able to interact with . Upon fundamental interaction , Arthur will pass into the hole and findthree gold bars .
Jack Hall Gang Treasure Hunt
Jack Hall Gang Map 1
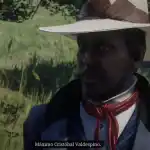
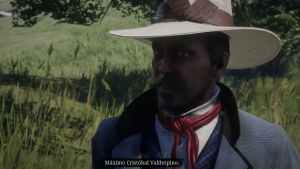
When Chapter two begins , Arthur will get a strange mission where he meets the NPC called Maximo Cristobal Valdespino . Upon fundamental interaction , he will evidence Arthur he has a treasure map made by the notorious Jack Hall Gang . He then offers to deal the treasure map to Arthur for $ 10 . If you accept his offer , you will have find the first map for this treasure hunt .
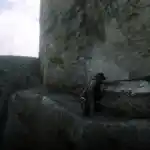
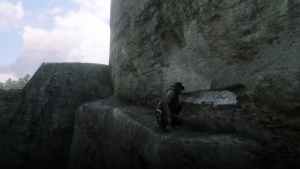
Jack Hall Gang Map 2
To find the 2d treasure map of the Jack Hall Gang , you will involve to scale the summit of the mountain near Caliban ’s hind end , place toward the northwest of Horseshoe Overlook . Upon reaching the top , you will see an opening toward your right . Head down this chess opening , and keep walking on the shelf of the pot until you reach the death . Here , you will detect a pearl necklace and the second mapping of this hoarded wealth Holman Hunt .
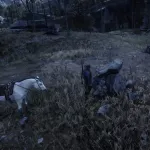
Jack Hall Gang Map 3
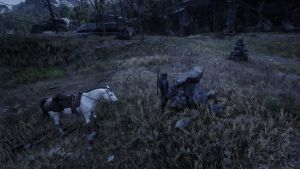
The terminal function of this treasure hunt can be found in Cotorra Springs , located northwest of Fort Wallace . Once you pass the location , seem for the stout rock structure with a flat rock on top . Interact with it to recover $ 15 , and the third mapping extend to the treasure .
Jack Hall Gang Treasure Location
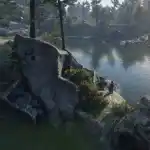
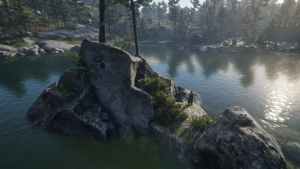
The concluding location of the Jack Hall Gang gem is in O’Creagh ’s Run , which is located west of Annesburg . Once you reach the locating , you will find a small island in the middle of the lake . Swim to it , and you will notice a clit prompt near a little stone . Interact with it to findtwo gold bars .
interrelate :
The Poisonous Trail Treasure Hunt
The Poisonous Trail Map 1
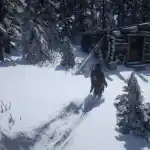
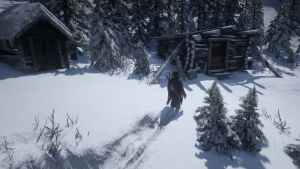
The first map of the Poisonous Trail treasure hunt can be found inside a little lodge in front of Cairn Lake , located east of Colter , or northward of Barrow Lagoon . Enter the house and launch the lockbox to get hold some repeater cartridges , a Ginseng Elixir , and the Poisonous Trail treasure map .
The Poisonous Trail Map 2
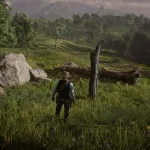
The second map for this treasure hunting can be found near Face Rock , located in Scarlett Meadows , north of Rhodes . To the right side of Face Rock , you will discover a tree stump you’re able to interact with . Doing so will grant you $ 10 , and the second map to the treasure hunting .
The Poisonous Trail Map 3
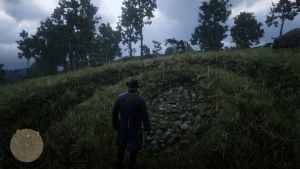
The third and net mapping can be come up inside a hole in a pebble social system locate east of Van Horn Trading Post . Upon reaching the localization , interact with the hole to find a platinum halo watch bracelet and the final map for this treasure hunt .
The Poisonous Trail Treasure Location
The last map will chair you into a dark cave behind the Elysian Pool , located southwest of Annesburg . Be sure to fit your torch while you ’re in there . Go direct ahead , and then drop down to the crevice below . There , you will find a narrow crawl distance through which you enter by scrunch up . Once you ’re through , take the ripe path , and move around right when it terminate . Drop down to the ledge in front , and then slide down the slippery incline . Here , you will findfour Au barshidden behind a rock .
Annesburg Sketched Map Treasure Hunt
Annesburg Sketched Map Location
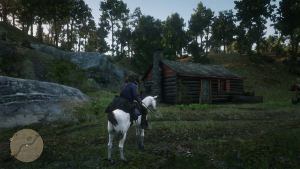
player can find a sketched gem single-valued function inside a house called Reed Cottage , located north of Annesburg . Once you progress to the sign of the zodiac , enter it and search the chimney . Here , you will find a sketched map for a treasure James Henry Leigh Hunt .
Annesburg Sketched Map Treasure Location
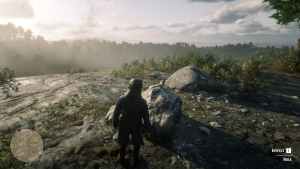
The map you find in Reed Cottage will lead you to a tableland determine hill locate on the western banks of the Kamassa River , or northwest of the Elysian Pool . Once there , interact with the modest rock show in the look-alike above to discover agold ingot .
Elemental Trail Treasure Hunt
The Elemental Trail treasure hunt is an activity that John Marston can only access once the Epilogue start after the completion of Chapter six .
Elemental Trail Map 1
Toward the very Rebecca West of New Austin , east of the Sea of Coronado , you will come across a corpse hanging by a rophy . pullulate the rope , and then loot the body to rule the first map for the Elemental Trail .
Elemental Trail Map 2
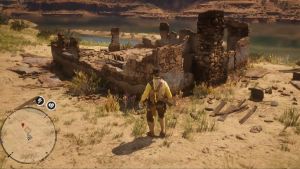
The next location is a place squall Greenhollow , which is situated to the Orient of Lake Don Julio . Enter the ruin of the pocket-size mansion you recover here , and seek the chimney . Doing so will grant you the second map for this gem .
Elemental Trail Map 3
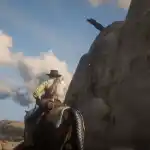
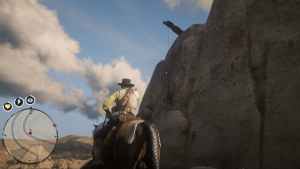
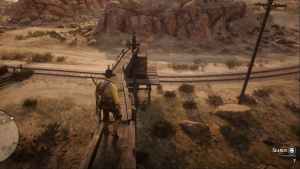
The concluding map for this treasure can be launch in Benedict Point , site south of Tumbleweed . Once you ’re there , find a way to climb onto the minute wooden bridge , as show in the picture above . A button prompt in the middle of this bridgework will tell you to search for a gap in the Grant Wood . Doing so will grant you the final map for this treasure .
Elemental Trail Treasure Location
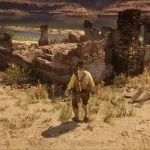
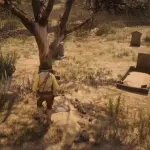
The terminal locating for this gem hunt will take you to a Church land site southeast of Armadillo . Once there , head inside the graveyard and front for the button prompting near the tomb in front of the Sir Herbert Beerbohm Tree . Doing so will grant youone atomic number 79 bar , and theCrow Beak Trinket .
wonder how to utilise cheater codes in Red Dead Redemption 2 ? contain outRed Dead Redemption 2 Cheats and Codes , right here on Pro Game Guides .

Screenshot by Pro Game Guides
Screenshot by Pro Game Guides

Image by Pro Game Guides
Screenshot by Pro Game Guide
Screenshot by Pro Game Guide
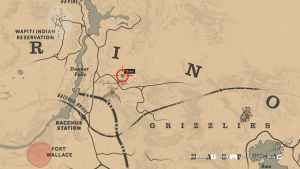
Image by Pro Game Guides
Screenshot by Pro Game Guide
Screenshot by Pro Game Guide
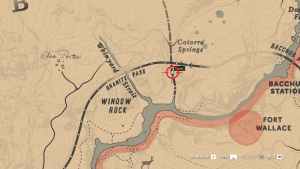
Image by Pro Game Guides
Screenshot by Pro Game Guide
Screenshot by Pro Game Guide
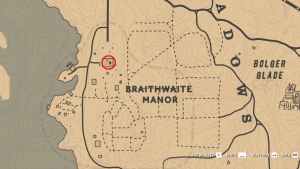
Image by Pro Game Guides
Screenshot by Pro Game Guide
Screenshot by Pro Game Guide
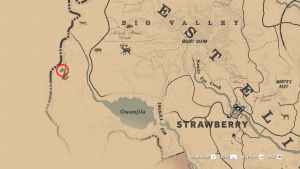
Image by Pro Game Guides
Screenshot by Pro Game Guide
Screenshot by Pro Game Guide

Image by Pro Game Guides
Screenshot by Pro Game Guide
Screenshot by Pro Game Guide
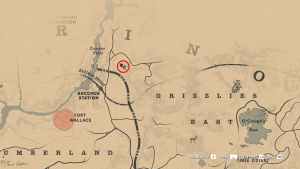
Image by Pro Game Guides
Screenshot by Pro Game Guide
Screenshot by Pro Game Guide
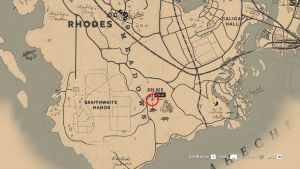
Image by Pro Game Guides
Screenshot by Pro Game Guide
Screenshot by Pro Game Guide

Image by Pro Game Guides
Screenshot by Pro Game Guide
Screenshot by Pro Game Guide
Screenshot by Pro Game Guide
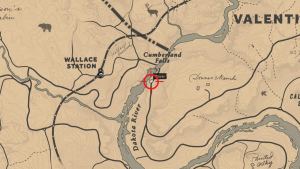
Image by Pro Game Guides
Screenshot by Pro Game Guide

Screenshot by Pro Game Guide
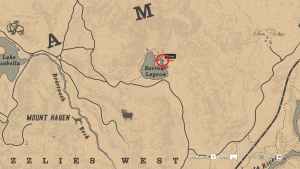
Image by Pro Game Guides
Screenshot by Pro Game Guide
Screenshot by Pro Game Guide
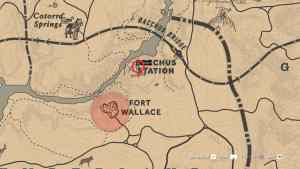
Image by Pro Game Guides
Screenshot by Pro Game Guide
Screenshot by Pro Game Guide
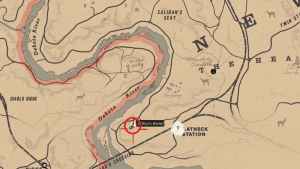
Image by Pro Game Guides
Screenshot by Pro Game Guide
Screenshot by Pro Game Guide
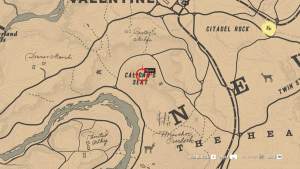
Image by Pro Game Guides
Screenshot by Pro Game Guide
Screenshot by Pro Game Guide
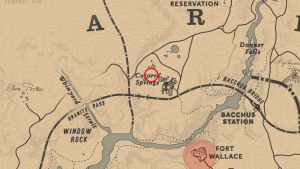
Image by Pro Game Guides
Screenshot by Pro Game Guide
Screenshot by Pro Game Guide

Image by Pro Game Guides
Screenshot by Pro Game Guide
Screenshot by Pro Game Guide
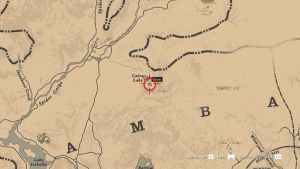
Image by Pro Game Guides
Screenshot by Pro Game Guide
Screenshot by Pro Game Guide
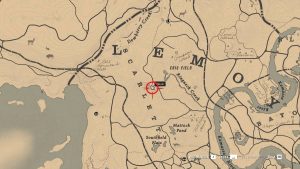
Image by Pro Game Guides

Screenshot by Pro Game Guide
Screenshot by Pro Game Guide
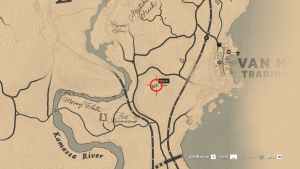
Image by Pro Game Guides
Screenshot by Pro Game Guide
Screenshot by Pro Game Guide
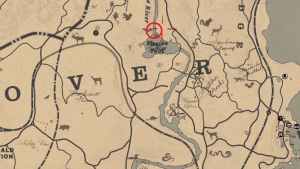
Image by Pro Game Guides
Screenshot by Pro Game Guide
Screenshot by Pro Game Guide
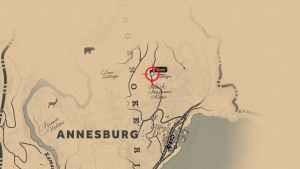
Image by Pro Game Guides

Screenshot by Pro Game Guide
Screenshot by Pro Game Guide
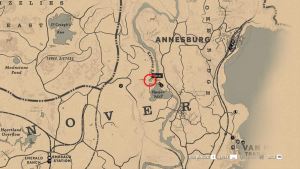
Image by Pro Game Guides
Screenshot by Pro Game Guide
Screenshot by Pro Game Guide
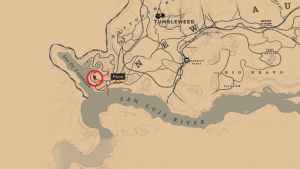
Image by Pro Game Guides
Screenshot by Pro Game Guide
Screenshot by Pro Game Guide
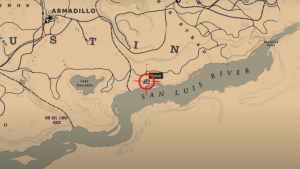
Image by Pro Game Guides

Screenshot by Pro Game Guide
Screenshot by Pro Game Guide
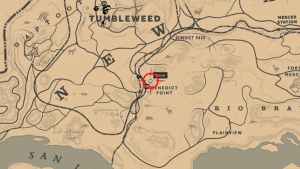
Image by Pro Game Guides
Screenshot by Pro Game Guide

Screenshot by Pro Game Guide
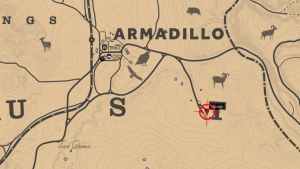
Image by Pro Game Guides
